Onboard Your Device
This tutorial guides you through onboarding an Advantech edge device to the WEDA framework. The process involves registering your organization and device on WEDA Core (the central management service) and provisioning WEDA Node (the client daemon) on your physical edge hardware.
Prerequisites
- Confirm your target edge device meets the system requirements detailed in the Prerequisites & Basics guide.
- Download and import the WEDA Postman Collections: 0-WiseSso, 1-Org&ClientCred, 2-Provisioning&Activation, and 3-Telemetry.
- Select your active Postman environment and confirm that the required variables (e.g., domain, tenantPath, appPath, login, and password) are filled out.
Workflow Overview
Onboarding is a coordinated sequence of actions between WEDA Core and WEDA Node:
Quick Navigation
- Retrieve Access Token
- Create an Organization
- Retrieve Hardware Metadata
- Register the Device
- Launch WEDA Node & Verify Connection
- Get Device Telemetry Data
1. Retrieve Access Token (WEDA Core)
Before invoking WEDA Core APIs, you must authenticate through the WiseSSO Identity Service to retrieve a Bearer Token.
Postman Collection: 0-WiseSso
Execute the five requests in sequence to establish your identity context. Postman scripts will automatically clear cookies, manage redirects, and extract the accessToken variable.
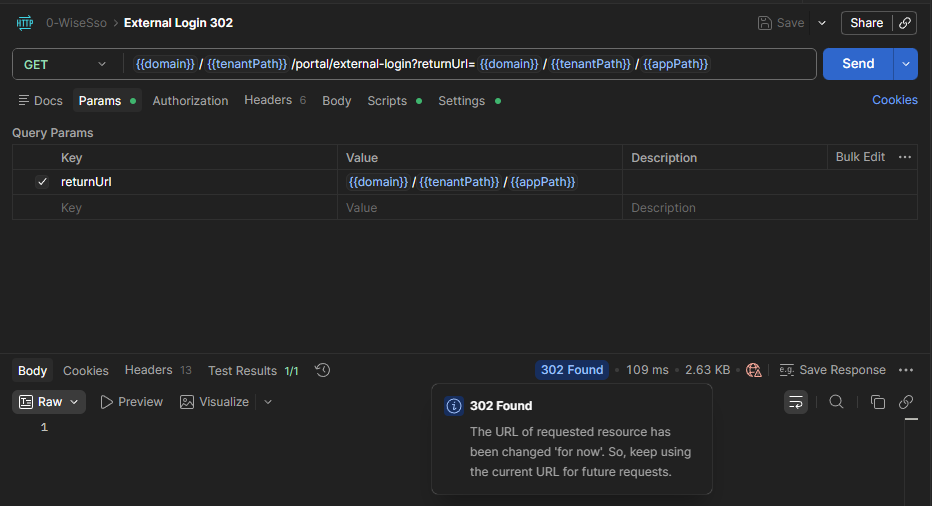
- External Login 302
- Method: GET
- URL:
{{domain}}/{{tenantPath}}/portal/external-login?returnUrl={{domain}}/{{tenantPath}}/{{appPath}} - Description: Initializes the identity federation redirect flow and parses the query parameters to set
client_id,tenantId, andredirect_urienvironment variables. - Result: WEDA Cloud returns
302.
- Account Login
- This step submits your account credentials to authenticate the user with the identity service.
- Expected result: WEDA Cloud returns
200, accepts the login, and updates the authenticated session context.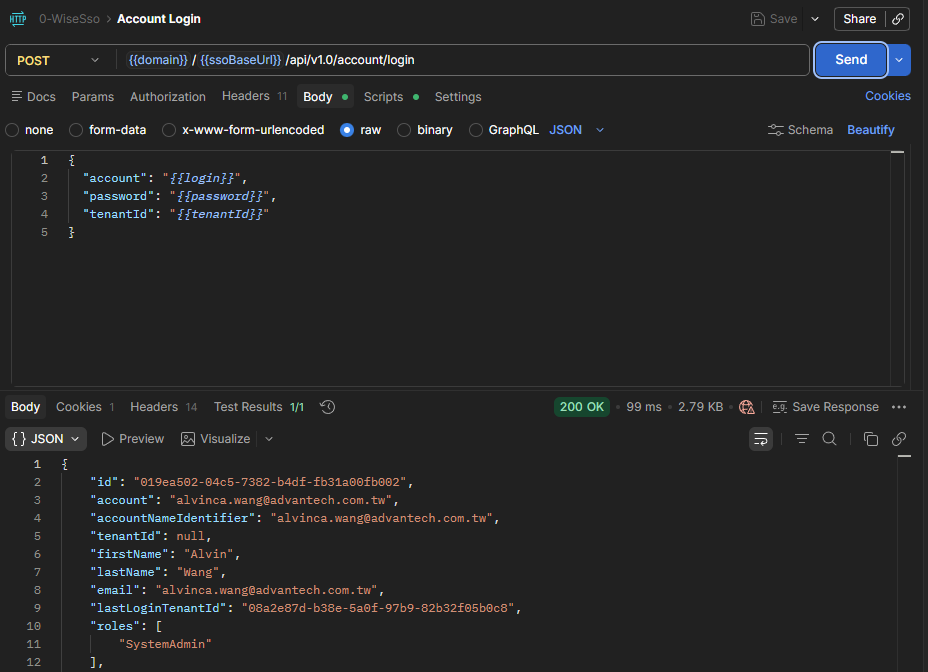
- External Login 200
- This call completes the tenant-aware login return flow and confirms the correct tenant context.
- Expected result: WEDA Cloud returns
200with the expected tenant context.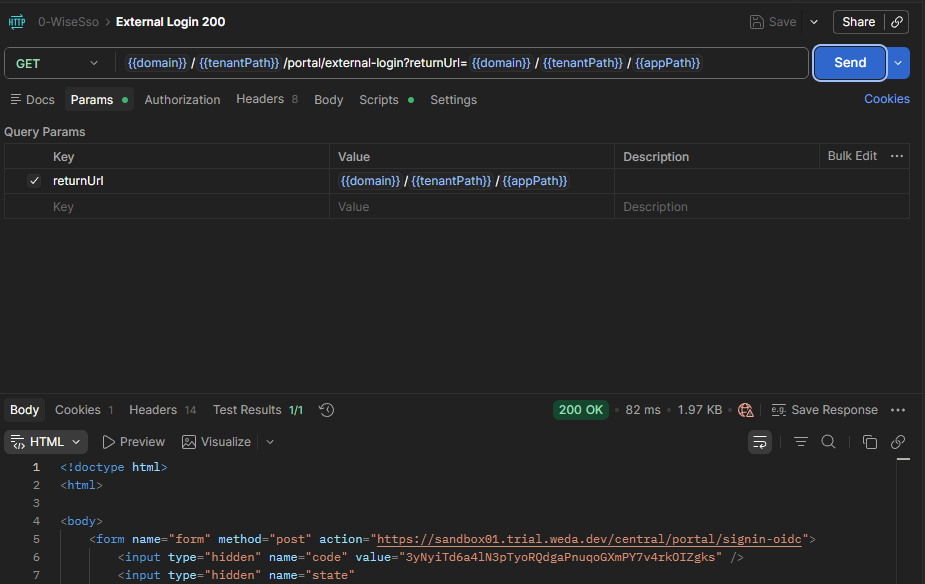
- Signin Oidc
- This step uses the authenticated session cookie to perform OIDC (OpenID Connect) sign-in and obtain exchangeable identity tokens.
- Expected result: WEDA Cloud returns
302and redirects with the OIDC exchange context.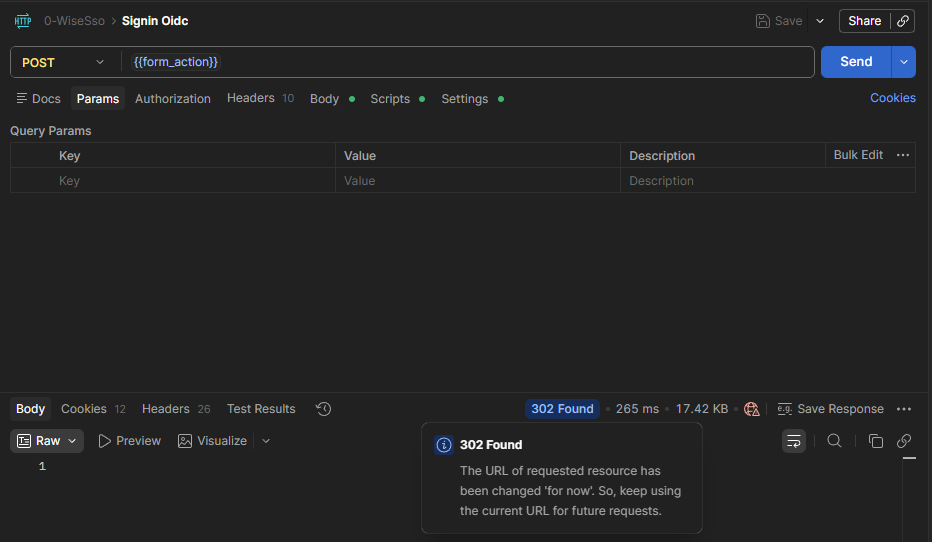
- This final request exchanges the OIDC result for the WEDA access token used by subsequent API requests.
- Expected result: WEDA Cloud returns
201with a valid WEDA access token for subsequent API calls.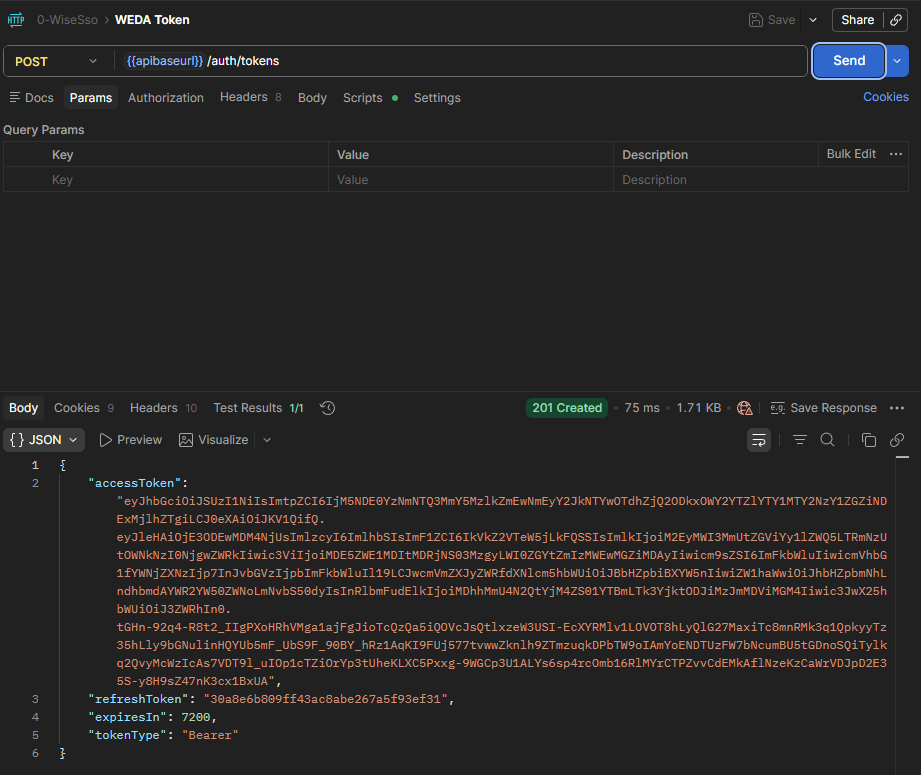
2. Create an Organization (WEDA Core)
Organizations isolate devices, telemetry rules, and containers within a tenant on WEDA Core.
Postman Collection: 1-Org&ClientCred
Execute the following requests to establish your organization space. This collection automatically injects the {{accessToken}} Bearer token into all requests.
- Org Create: Create a new organization with a unique name.
- Method: POST
- URL:
{{apibaseurl}}/orgs - Payload:
{
  "name": "someOrgName"
}
- Description: Creates a unique organization associated with your login account. On success (HTTP 201 Created), Postman extracts the ID and saves it to your environment as
org_id.
If the organization name already exists, WEDA Cloud returns 409.
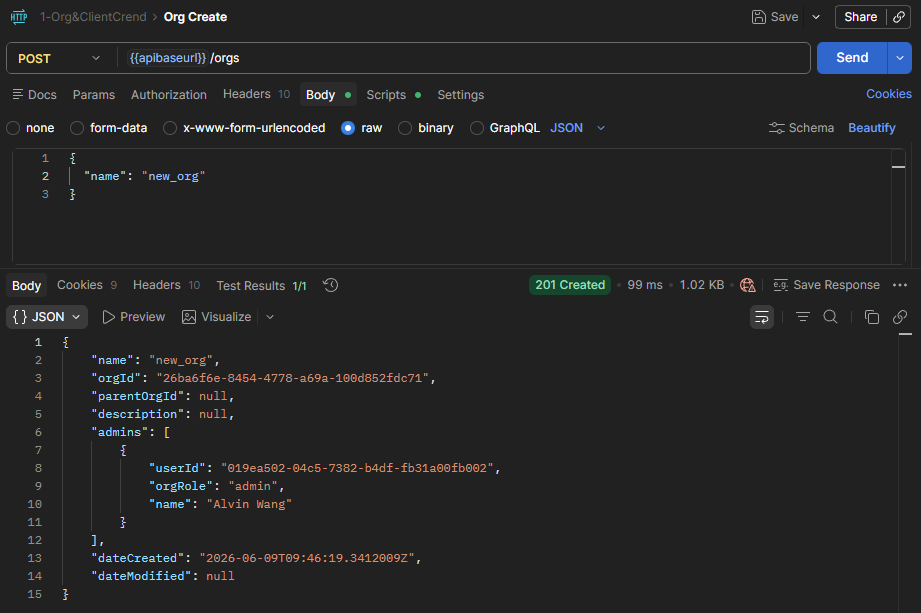
Example Request: Curl
curl --location --request POST 'https://{domain}/{tenantPath}/{appPath}/api/v1/orgs' \
--header 'Content-Type: application/json' \
--header 'Authorization: Bearer {access-token}' \
--data '{
  "name": "new_org"
}'
Example Response
{
  "name": "new_org",
  "orgId": "26ba6f6e-8454-4778-a69a-100d852fdc71",
  "parentOrgId": null,
  "description": null,
  "admins": [
    {
      "userId": "019ea502-04c5-7382-b4df-fb31a00fb002",
      "orgRole": "admin",
      "name": "Alvin Wang"
    }
  ],
  "dateCreated": "2026-06-09T09:46:19.3412009Z",
  "dateModified": null
}
Key parameters:
orgId: The organization ID returned after creating the organization. You will use it again in the device creation step.- Example: In the response above,
26ba6f6e-8454-4778-a69a-100d852fdc71is theorgId.
- Example: In the response above,
Other APIs in the 1-Org&ClientCred collection:
- Org List: Get the list of organizations.
- Org Delete: Delete an organization by its ID.
3. Retrieve Hardware Metadata (WEDA Node)
To register your edge device, WEDA Core requires its unique MAC address and hardware profile name.
- Access your physical edge hardware.
- Follow the steps in WEDA Node Activator Installer to download and setup the Activator.
- Launch the WEDA Node Activator utility, a shortcut is created on your desktop after setup.
- Copy the metadata details from the Activator GUI (see below):
- Device (deviceId): The device's primary MAC address formatted as a lowercase, continuous string with no colons or hyphens (e.g.
cc827f50f406). - Model (hwModel): The local system model name retrieved from
/etc/board(e.g.,MIC-710orUNO-2484v2).
- Save these values directly to your Postman environment under the variables
deviceIdandhwModel.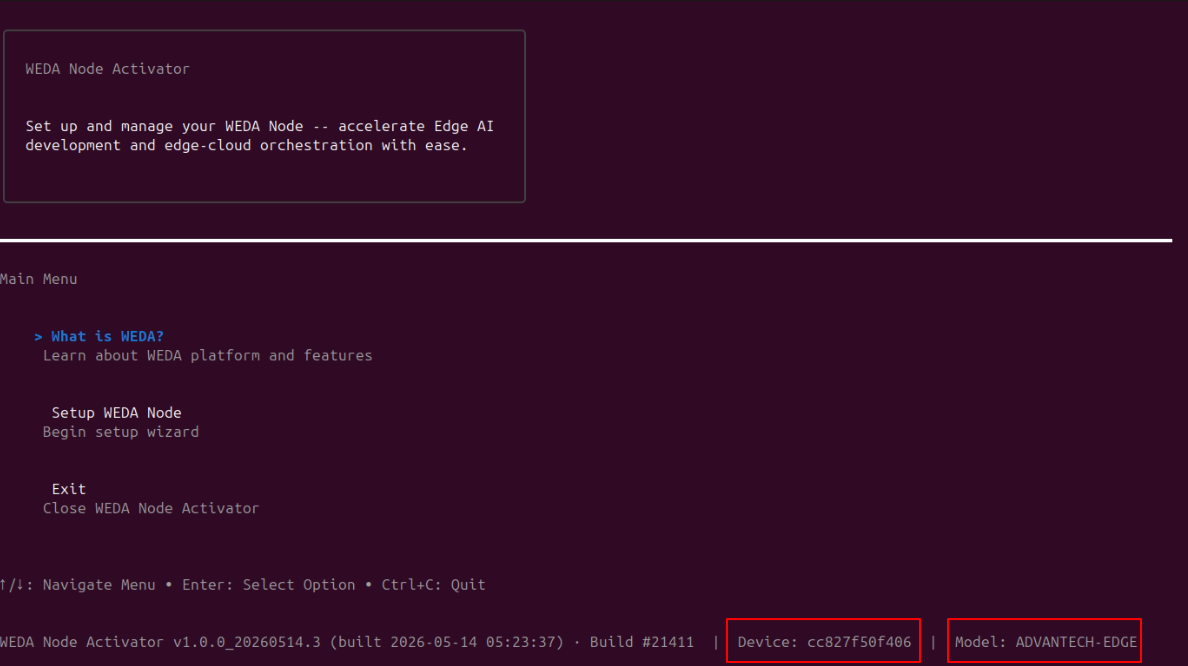
deviceId: Find this value in the Device field.hwModel: Find this value in the Model field.
4. Register the Device (WEDA Core)
Bind your physical hardware credentials to your WEDA Core organization.
Postman Collection: 2-Provisioning&Activation
- Node Register: Create a new device under the organization.
- Method: POST
- URL:
{{apibaseurl}}/orgs/{{org_id}}/devices - Payload:
{
"deviceId": "{{deviceId}}",
"hwModel": "{{hwModel}}",
"deviceName": "{{hwModel}}-{{deviceId}}"
}
- Expected result: WEDA Cloud returns
201and provides the registered device information. At this stage, WEDA Core recognizes the identity of your device. Its status remains Registered until the WEDA Node client daemon is launched and activated on the physical edge.
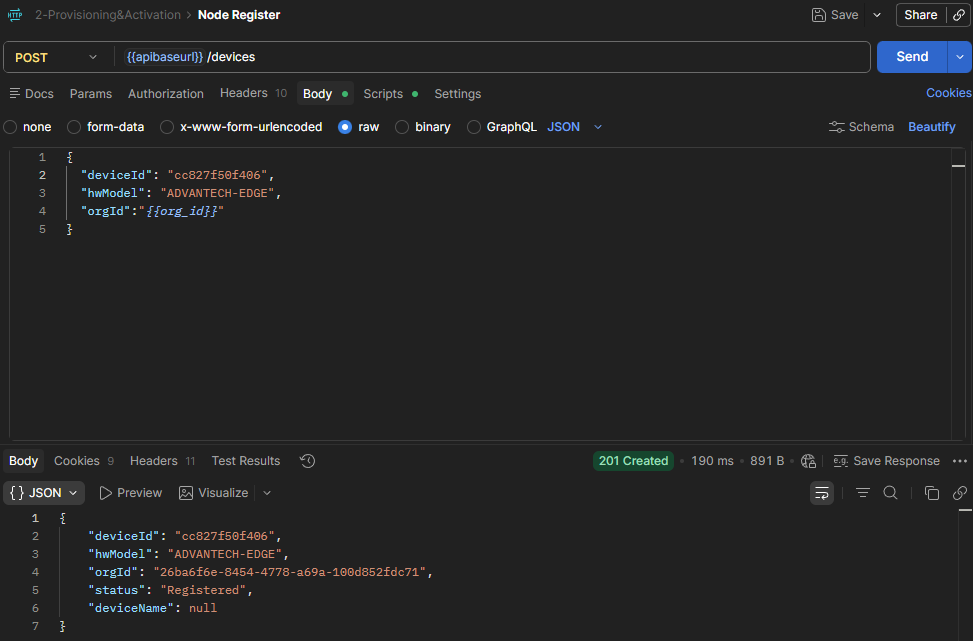
Example Request: Curl
curl --location --request POST 'https://{domain}/{tenantPath}/{appPath}/api/v1/orgs/{orgId}/devices' \
--header 'Content-Type: application/json' \
--header 'Authorization: Bearer {access-token}' \
--data '{
  "deviceId": "cc827f50f406",
  "hwModel": "ADVANTECH-EDGE",
  "deviceName": "ADVANTECH-EDGE-cc827f50f406"
}'
Example Response
{
    "deviceId": "cc827f50f406",
    "hwModel": "ADVANTECH-EDGE",
    "orgId": "26ba6f6e-8454-4778-a69a-100d852fdc71",
    "status": "Registered",
    "deviceName": "ADVANTECH-EDGE-cc827f50f406"
}
Key parameters:
deviceId: Must be a MAC address (lowercase letters and numbers only, no symbols).hwModel: Hardware model of the device, for exampleMIC-710orADVANTECH-EDGE.orgId: The organization ID from the previous step — supplied in the URL path, not the request body.status: At this stage, the device is only registered in WEDA Cloud. If WEDA Node is not connected yet, the status remainsRegistered.deviceName: Optional at registration. If omitted, WEDA Core auto-generates it as{hwModel}-{deviceId}— the Postman request pre-fills{{hwModel}}-{{deviceId}}; you can customize it.
Other APIs in the 2-Provisioning&Activation collection:
- Node Activation: Get device auth info used for activation (encrypted auth payload/file) (see Appendix).
- Node List: Get a paginated device list. You should see the newly created device in the list.
- Node List Under Org: Get the list of devices under the organization.
- Token Refresh: Get a new access token using the refresh token.
- Node Deactivate: Deactivate a device by its ID. status:
deactivate - Node Remove: Delete a device by its ID.
Once the device is activated and syncing, its sensors appear as DataStreams. Those are covered
by the 3-Telemetry collection in step 6.
5. Launch WEDA Node and Verify Connection (WEDA Node)
Finalize connecting your device to WEDA Core
Finish provisioning your Advantech edge hardwdare for remote management.
Step 1: Run WEDA Node Activator
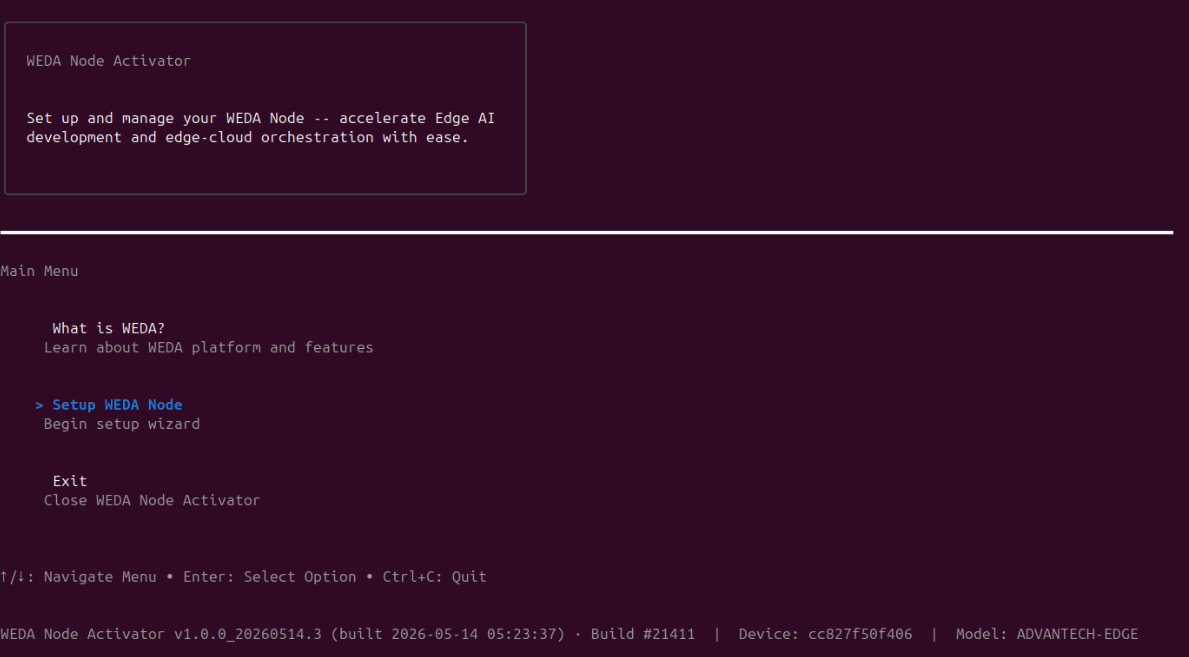
- Run WEDA Node Activator on the edge device, accessible from the desktop shortcut.
- Select Setup WEDA Node
Step 2: Accept License Agreement
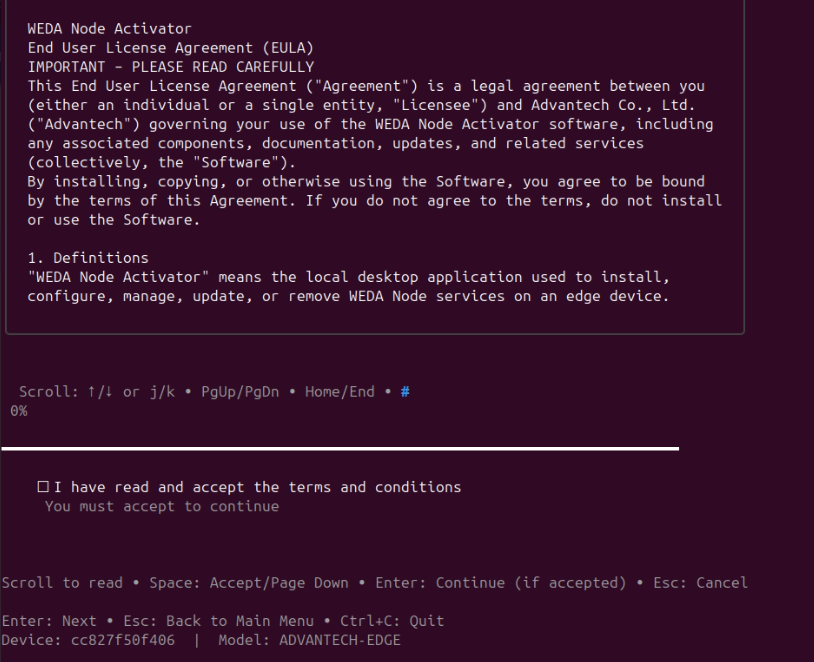
Review the End-User License Agreement (EULA). Press Space to scroll and confirm consent.
Step 3: Select Credential Source
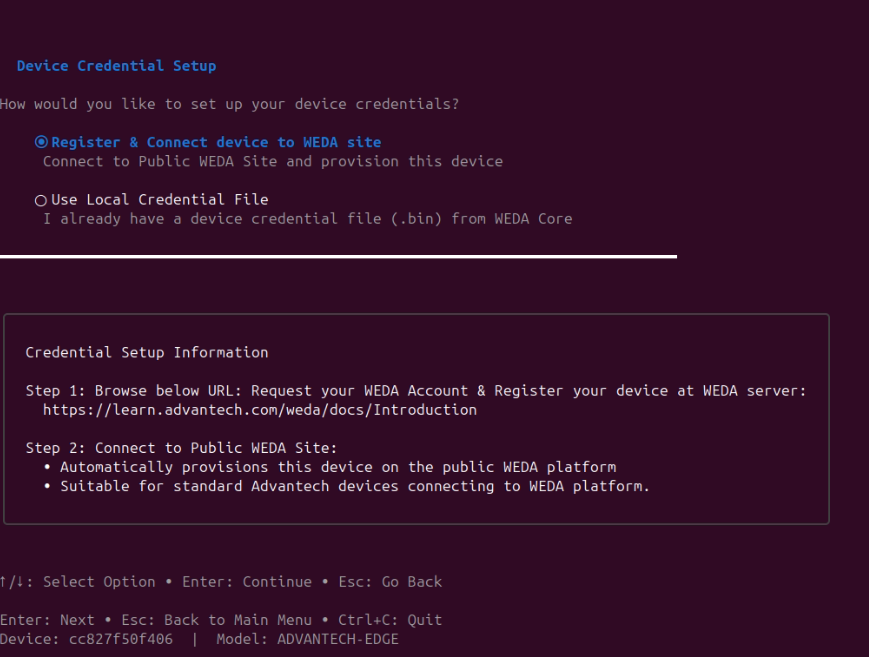
You will be prompted to select how this device securely pulls down its central synchronization keys:
Option A: Register & Connect Device to WEDA Site (Recommended)
Ideal for internet-connected standard devices. It directly links the local WEDA Node to the public WEDA Core service over HTTPS using pre-built master keys bundled with the Activator. Select this option and press Enter.
Expected result: The device will automatically provisioned on the public WEDA Core service on upon starting the Activator.
Option B: Use Local Credential File
For private, offline, or local networks (LAN). If selecting this method, fetch your key file from WEDA Core using the Node Activation API request.
If you need to register by local credential file, follow Appendix: Register by Local Credential File.
Step 4: Confirm Configuration Settings
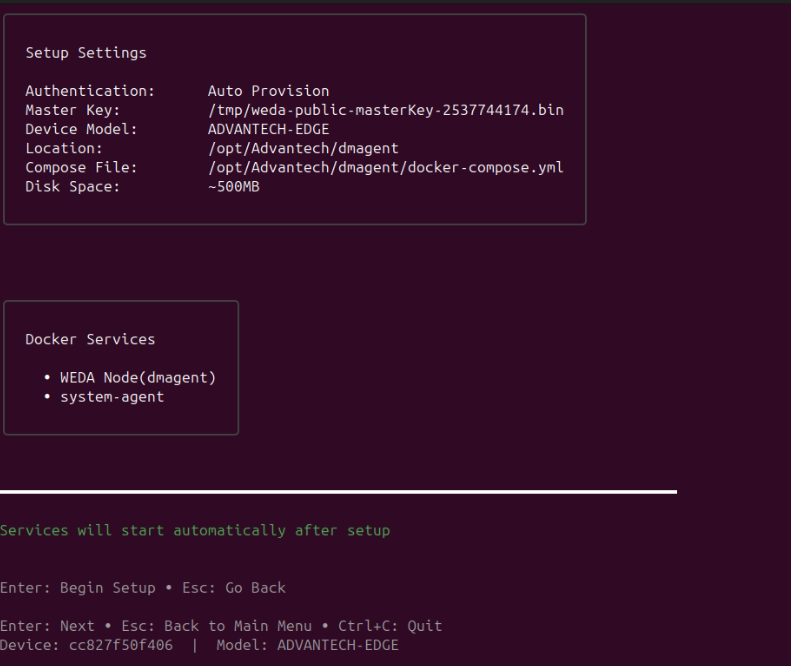
Verify the displayed installation targets, target endpoints, network interfaces, and parameters, then confirm configuration.
Step 5: Finish Service Connections
The installer pulls the WEDA Node container images, sets up secure network boundaries, and spawns the WEDA Core client services. This takes roughly 2–5 minutes depending on network bandwidth.
Do not close the console window or press Ctrl + C, which can interrupt this terminal process.
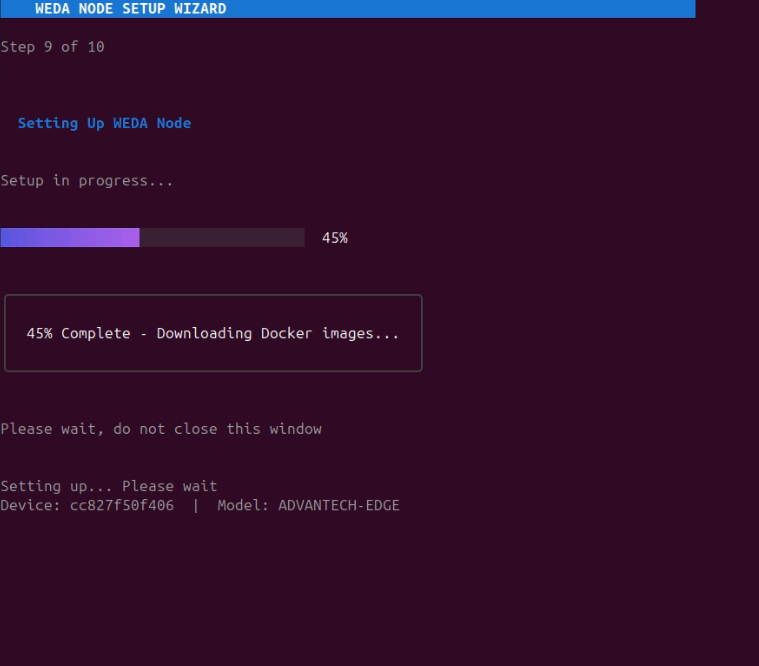
Expected result: Container images downloaded, started, and services running.
Step 6: WEDA Node Installation Complete
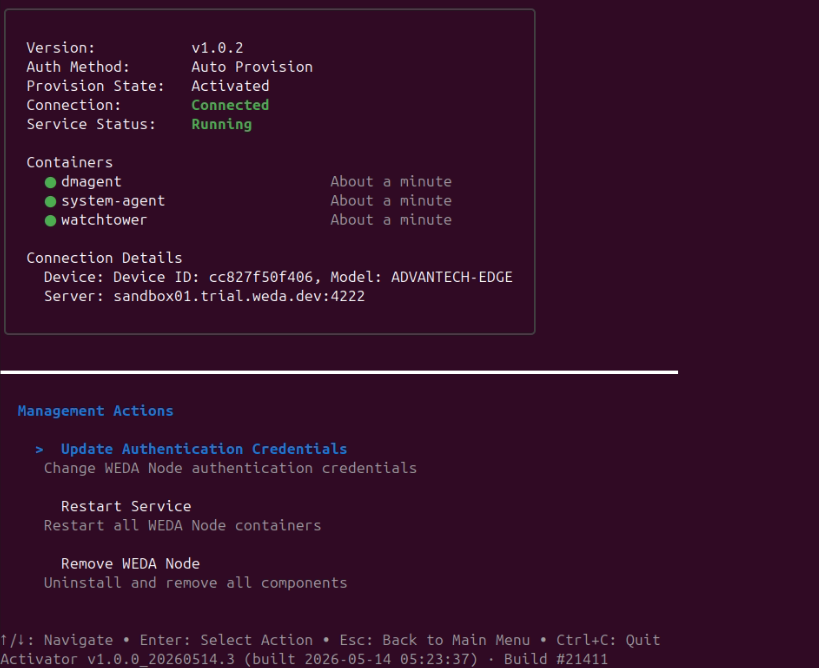
Once completed, the Activator launches the live WEDA Node Service Dashboard.
Service Dashboard
Status icons:
●green — running / connected / registered○grey — stopped / unknown✗red — failed / disconnected
Connection box color:
- Green border — device connected to WEDA server
- Red border —
REG_FAILEDor container not found - Grey border — intermediate states
The dashboard auto-refreshes every 5 seconds.
Management Actions
| Action | Description |
|---|---|
| Update Authentication Credentials | Replace the master key or credential file without reinstalling |
| Restart Service | Stop and restart all WEDA Node Docker containers |
| Remove WEDA Node | Uninstall containers, volumes, and configuration (type REMOVE to confirm) |
Verify WEDA Node Connection from WEDA Core
Postman Collection: 2-Provisioning&Activation -> Node List Under Org
- Node List Under Org: Get the list of devices under the organization.
- Method:
GET - URL:
{{apibaseurl}}/orgs/{{org_id}}/devices - Description: This request queries the devices under
orgIdand is used to verify whether the WEDA Node has connected successfully from the Cloud side. - Expected result: WEDA Cloud returns
200, and the response includes yourdeviceId,hwModel, and currentstatus. - Connection check: when the node is online and activated, the device status should become
Activated.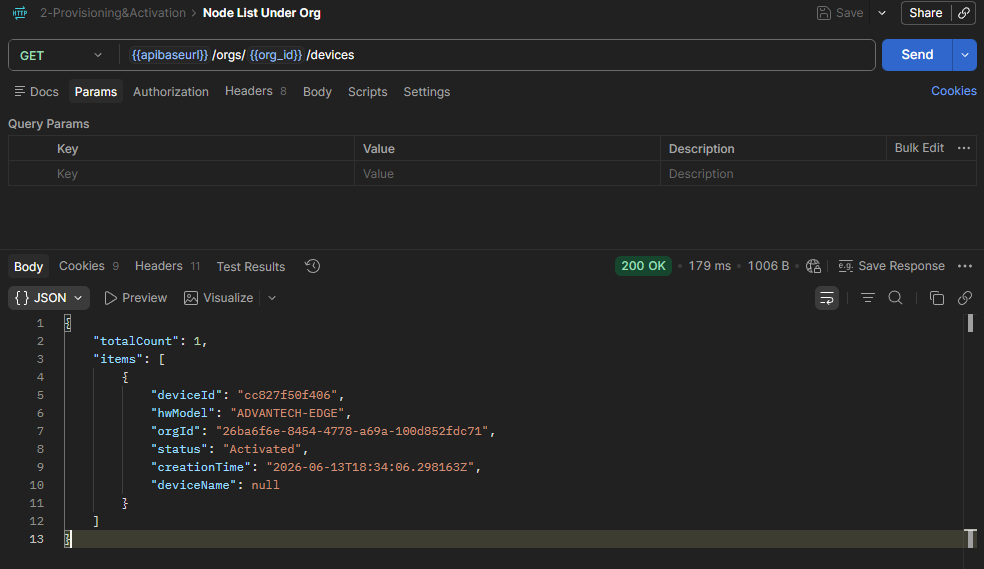
- Method:
6. Get Device Telemetry Data
Once the WEDA Node client daemon is running and authorized, telemetric updates automatically flow from WEDA Node to WEDA Core.
Postman Collection: 3-Telemetry
Each sensor the device reports becomes one DataStream. Reading a value is two requests: list the device's DataStreams to find the one you want, then query that DataStream's latest value.
Step 1: List the device's DataStreams
- Data Stream List
- Method:
GET - URL:
{{apibaseurl}}/orgs/{{org_id}}/devices/{{deviceId}}/data-streams?skipCount=0&maxResultCount=10 - Description: Returns every DataStream on the device, covering both system status and onboard sensor measurements, with the
dataStreamIdyou need for the next request. - Expected result: WEDA Core returns
200withtotalCountand a pageditemsarray. A typical WEDA Node reports around a hundred DataStreams, so raisemaxResultCountor page through withskipCountto see them all.
- Method:
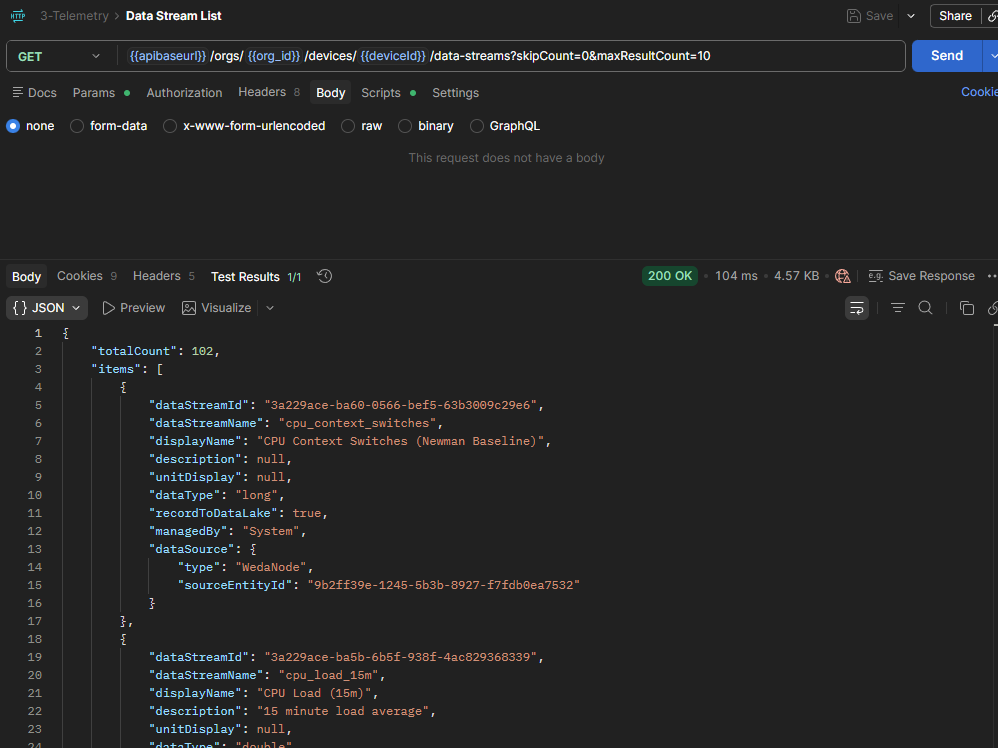
Example Response
{
    "totalCount": 102,
    "items": [
        {
            "dataStreamId": "3a229ace-ba60-0566-bef5-63b3009c29e6",
            "dataStreamName": "cpu_context_switches",
            "displayName": "CPU Context Switches",
            "description": null,
            "unitDisplay": null,
            "dataType": "long",
            "recordToDataLake": true,
            "managedBy": "System",
            "dataSource": {
                "type": "WedaNode",
                "sourceEntityId": "9b2ff39e-1245-5b3b-8927-f7fdb0ea7532"
            }
        },
        {
            "dataStreamId": "3a229ace-ba5b-6b5f-938f-4ac829368339",
            "dataStreamName": "cpu_load_15m",
            "displayName": "CPU Load (15m)",
            "description": "15 minute load average",
            "unitDisplay": null,
            "dataType": "double",
            "recordToDataLake": true,
            "managedBy": "System",
            "dataSource": {
                "type": "WedaNode",
                "sourceEntityId": "9b2ff39e-1245-5b3b-8927-f7fdb0ea7532"
            }
        }
    ]
}
Key fields:
dataStreamId: pass this to the latest-value and historical-value requests.dataType: declares the type of the values this DataStream carries.managedBy:Systemfor streams the device syncs automatically,Userfor ones you create.dataSource: read-only lineage. For a device sensor,typeisWedaNodeorWedaSubNodeandsourceEntityIdis the sensor's resource ID.recordToDataLake: whether values are retained for historical queries.
The request's Tests script stores the result for you: it looks for a DataStream named
cpu_usage, falls back to the first item, and writes dataStreamId and dataStreamName into your
environment. Run this request once and the next two requests work without any manual copying.
Step 2: Read its latest value
- Data Stream Latest Value Get
- Method:
GET - URL:
{{apibaseurl}}/orgs/{{org_id}}/devices/{{deviceId}}/data-streams/{{dataStreamId}}/values/latest - Description: Returns the most recent sample for one DataStream, within the system-defined retention period (default 60 minutes).
- Expected result: WEDA Core returns
200with the latest sample.
- Method:
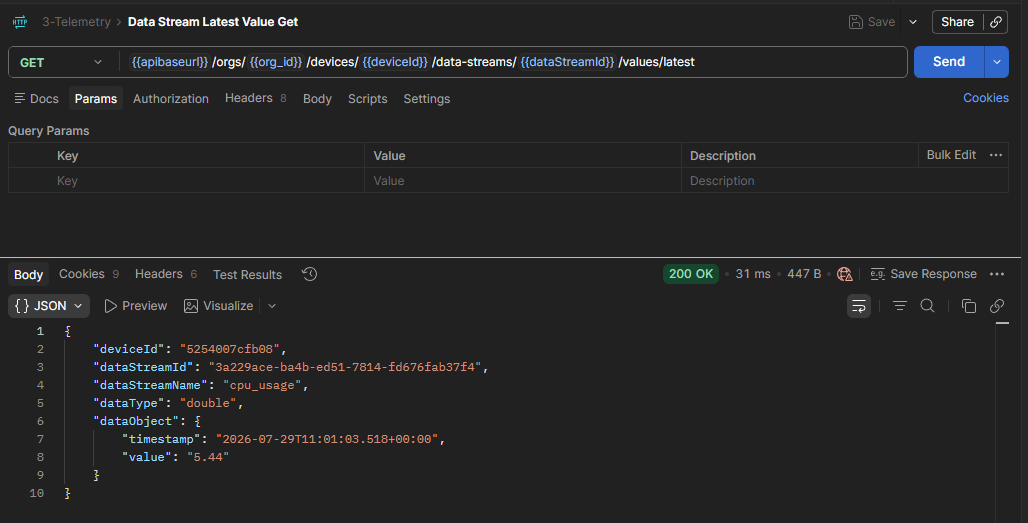
Example Request: Curl
curl --location --request GET 'https://{domain}/{tenantPath}/{appPath}/api/v1/orgs/{orgId}/devices/{deviceId}/data-streams/{dataStreamId}/values/latest' \
--header 'Content-Type: application/json' \
--header 'Authorization: Bearer {access-token}'
Example Response
{
    "deviceId": "cc827f50f406",
    "dataStreamId": "e033b4b3-36e0-4dbc-a6e4-1e77185402f4",
    "dataStreamName": "cpu_usage",
    "dataType": "double",
    "dataObject": {
        "timestamp": "2026-06-13T19:27:21.9064265Z",
        "value": 52.46
    }
}
Key parameters:
deviceId: The target device for the telemetry query.dataStreamId: Which DataStream to read — captured for you by the Data Stream List request.dataType: Declares the type ofdataObject.value.dataObject: The sample itself —timestamp(ISO 8601 UTC) andvalue.
Other APIs in the 3-Telemetry collection:
- Data Stream Historical Values Get: Get a time range of samples for one DataStream.
- Data Stream Blob Get: Download the binary payload of a DataStream whose
dataTypeis an image or octet-stream. - Sensor Settings Get: Get the device's telemetry configuration — which sensors are enabled and at what interval.
- Sensor Settings Change: Enable, disable, or re-interval a sensor.
Note (
Data Stream Historical Values Get):To change the query time range, open the Scripts tab and set
startTimeandendTime. Both values use URL-encoded ISO 8601 datetime strings (for example,2026-03-24T06%3A41%3A04.231Z), not milliseconds.Default script behavior:
startTime: current time minus 1 hourendTime: current time plus 1 minute
Appendix: Register by Local Credential File
Use this method when you need offline deployments or pre-provisioned devices.
- Get Local Credential File: Download the credential file (
.bin) for the device. - Place the downloaded credential file on the Edge device, or confirm the exact file path before setup.
- In WEDA Node Activator, select "Use Local Credential File" and press Enter.
- At previous Step 3 (Credential Source), select the authentication method and choose Local Credentials Setup for this scenario:
| Method | File | Use When |
|---|---|---|
| Auto Provision | N/A | Mass deployment - auto provisions many devices |
| Local Credentials Setup | Device Credential (.bin) | Single device with a downloaded credential file |
- In WEDA Node Activator file picker, select the credential file (
.bin) and press Enter. - Verify registration is successful on Edge and Cloud sides (for example, service is connected on Edge and device status becomes
Activatedon Cloud).
Expected result: WEDA Node is successfully registered and connected using the local credential file.
Congratulations! You have successfully onboarded your edge device to the WEDA framework by connecting WEDA Node with WEDA Core, and verified data telemetry. Continue to the next chapter to deploy AI Containers.